![Tether Primary Logo-01-1.png]](https://partners.tetherhq.com/hs-fs/hubfs/Tether%20Primary%20Logo-01-1.png?height=50&name=Tether%20Primary%20Logo-01-1.png)
Physical Installation Guide:
Please plug in your LoRaWAN gateway before you begin.
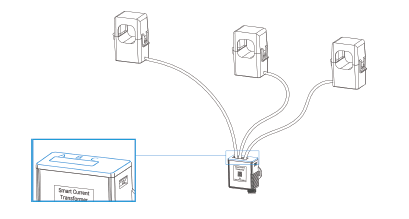
1. Device Assembly
Plug the CT clips into each of the corresponding locations on the Blue Transformer device. The CTs can be connected to the connectors of transceiver without any specific order matching
requirement.
2. Antenna Installation
Rotate the antenna into the antenna connector. The antenna should be installed vertically and
kept away from metal objects and obstacles.
Screw the antenna clockwise onto the port until secure, and position the antenna vertically to optimize LoRaWAN signal strength.
Note: Keep the device away from metal objects, obstacles, or the environment surrounded by
other electrical equipment that may cause interference. If necessary, please select a magnetic
antenna.
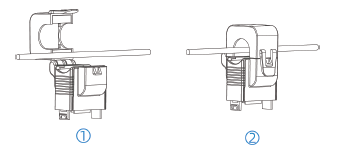
3. Transformer Installation
Ensure the ARROW inside the CT is facing the direction of current.

Open the current transformer to clip it around a single-phase wire. Then close the clip with a
slight “click” sound to make sure the clip firmly grips the wire.
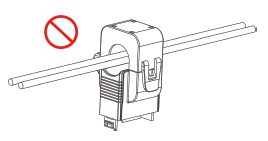
Do not place Phase wire and Neutral wire within a single current transformer.
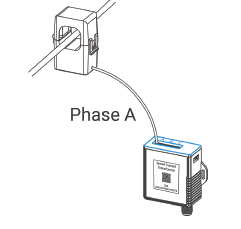
Please make sure that you at least connect a Phase A CT to phase A wire, otherwise the device will be powered off.
4. Transceiver Installation
The transceiver can be put or hang in any suitable position or to be fixed via cable-ties.
Assigning to the Portal:
See the below video:
Light Sequences for the CT305
|
Electrical Measurement |
CT305 Requirement |
|---|---|
|
Detection Parameter |
RMS Current |
|
Sampling Frequency |
3.3 kHz |
|
Working Frequency |
50~60 Hz |
|
Rated Primary Current (Per CT) |
500 A |
|
Rated Secondary Current |
150 mA |
|
Minimum Reporting Current (see note) |
30 A (1 minute interval) and 19 A (10 minute interval) |
|
Accuracy |
+/-1% |
|
Resolution |
1 mA |
|
Temperature Sensor |
Sensor Type: 1 x NTC Sensor |
NOTE: The minimum current to report data under different reporting intervals when the device is powered by the testing conductor. To measure lower currents, the device must be powered via USB.